he's god's worst man he took a life at 14 and god toasted and roasted him to death for that. he's also pretty sure hell is waiting for him after all this, but your honor......... he goofy...
❤29🔥6👍2
cheetz0 talks
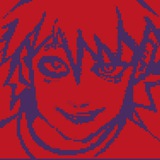
sketch for the unnamed dead cowboy 😭
he came to me in a prophetic dream and the moment i touched my stylus he just appeared on my screen it's kinda reminding me of what happened with kim kitsuragi
anyway he's ALSO god's most insane soldier and he too killed a man at a young age (he's literally not even old yet) but your honor......... shouldnt all men get to kill at least 1 dumb person every year? as a treat? for being such good boys and tolerating so much bullshit for a whole year? your honor, out of curiosity, how many guard dogs do you own?
anyway he's ALSO god's most insane soldier and he too killed a man at a young age (he's literally not even old yet) but your honor......... shouldnt all men get to kill at least 1 dumb person every year? as a treat? for being such good boys and tolerating so much bullshit for a whole year? your honor, out of curiosity, how many guard dogs do you own?
💋2
cheetz0 talks
the dragons have decided to cook him alive #wip
This media is not supported in your browser
VIEW IN TELEGRAM
this lowkey looks like an animation 🐟
💋10🔥4
I'll try to explain how i got the effects tomorrow :3 maybe it comes in handy later
❤9
cheetz0 talks
I'll try to explain how i got the effects tomorrow :3 maybe it comes in handy later
OKAY so if i let my perfectionism lead me I won't be putting out this guide until im dead,, so here i go explaining it thru text,,,,,
first, it's probably obvious that I'm using a ton of layers in different blend modes- sadly I don't got a solid plan in mind when choosing blend modes so I can't really explain it. for more in-depth rundown you gotta check Mat's explanation in their channel! this guy is incredible. that's where I learnt most of this
second, drawing abstract shapes with a lot of energy and movement in them is not something you can do without the help of something called accidents! it's kinda impossible to force a good swooshy line no matter how many times i ctrl+z my way into it. so to solve that, I altered most the ghostly lines with smudge tool on 100% strength. some brushes will blur your pixels instead of dragging them,, so I'll explain which brushes to use later.
and lastly, and oh my god this one is my favorite, the "Blend if" option in the layers menu is a goddamn game changer. i learned it from a graphic design centered youtube channel called Texturlabs and it's saved my brain a lot of meltdowns since. so,, maybe watching tutorials unrelated to painting can be a good source of inspo if you're into knowing every trick the app you're using has?
Telegram
MAT'S LABORATORY
نحوه کار اینا خیلی جالبه.
مثلا مولتیپلای، (اگر ۱ رو سفید و ۰ رو مشکی در نظر بگیریم و شید های طوسی رو اعداد بینش )
مقدار عددی پیکسل زیری و پیکسل رویی رو در هم ضرب می کنه.
مثلا مولتیپلای، (اگر ۱ رو سفید و ۰ رو مشکی در نظر بگیریم و شید های طوسی رو اعداد بینش )
مقدار عددی پیکسل زیری و پیکسل رویی رو در هم ضرب می کنه.
❤2
for the smudge tool,, if you want to move paint around without blending it,,, put strength on 100%, go to brush settings and disable "transfer" and "shape dynamics"
👍1
so how it works? we know that digital brushes are made of a stamp being pasted over and over to make a stroke. shape dynamics is responsible for changing the tip of the stamp and Scattering will randomize the placement of each stamp so in a way it gets fuzzy/noisy.
now, from what i guess, smudge tool works like a brush too, with the difference being that the color data isn't being "stamped" or inserted like the way brush tool does. instead, it takes the data from the layer you're on and drags those same colors around. if the colors are randomized like how Scattering did it, all the colors get mixed together, making it even. and that is why the smudge tool is used to create blur.
so to summerize, if we overdo the strength of this dragging action the smudge tool provides and remove every randomizing quality of the brush we're using we'll be left with this nice effect that can help to create more natural lines
❤5
and for the "Blend if" option...........
double click on a layer and this menu opens. the two bars at the bottom are what we're working with. it controls how much of the current layer or the one below can show through each other with the determining factor being the value. it's basically like a really quick layer mask that filters out any value you like. don't let my sleep deprived bum and bad sentencing scare you, try it out its cool and easy!
so for example,,, for the sausages layer im only allowing the values brighter than 53 to appear over the moon layer. that means anything too dark will get masked out, thus making it look like they're grilling willies on the moon
👍4🆒3❤1